

Prepare Your Files
We only accept print-ready PDF files for printing. We suggest using Adobe InDesign to create your files. If you need help laying out your book, we can help you find a good designer.
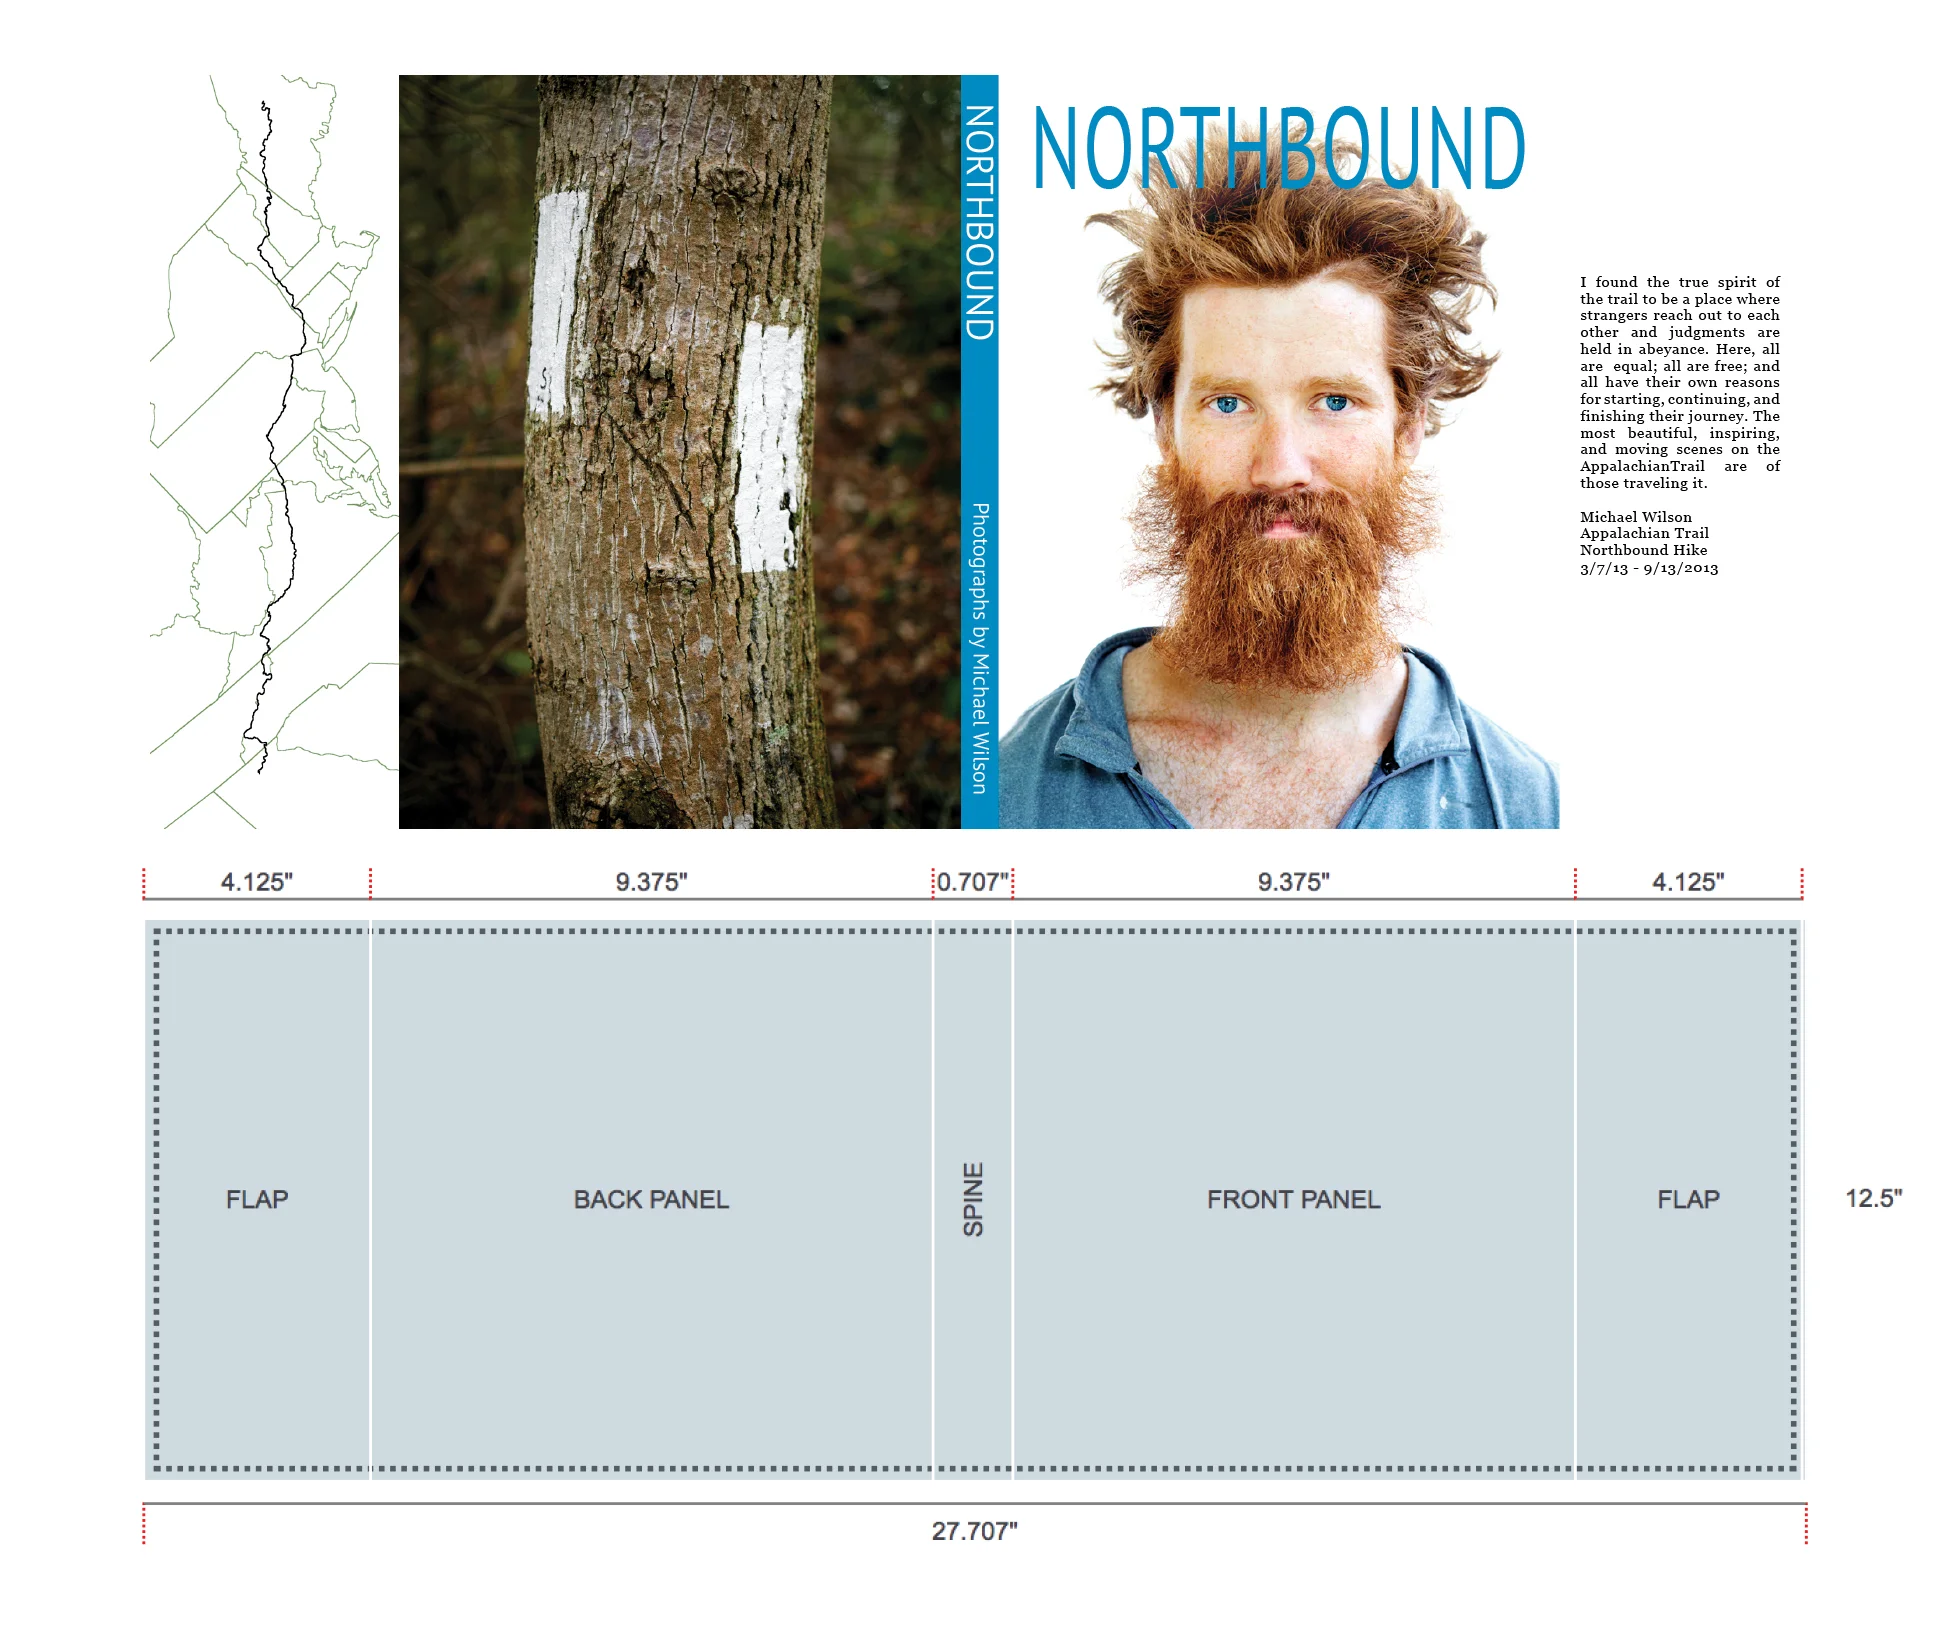
Cover Creation
For printed softcovers, hardcover printed wraps, and dust jackets you must create and submit a print-ready PDF separate from your book’s contents.

Example of Printed Wrap Dimensions
Example of Dust Jacket Dimensions
Cover Calculator
Use our online cover calculator to get the correct dimensions for your Printed Softcover, Dust Jacket or Printed Wrap:
Cover Size Calculator
Please take note of the maximum spine text height for your book provided by the calculator. Minimum page count for spine text is 60 pages.
Printed Wrap
0.8" bleed on all sides. Important elements such as type and logos should be placed at least 0.25" (1/4") inside of the bleed area.
Dust Jacket
0.25" bleed on all sides
Softcover
0.25" bleed on all sides
Inset Images
0.125" bleed on all sides. We accept PDF files sized to match one of the preset sizes at 300 dpi.
Duplex Printed Covers
For duplex printed covers, the inside cover should be included in the cover file as a second page. The overall dimensions are the same for both outside and inside covers. On the inside cover, please add a white area the same width as the spine, plus 5mm on either side.
Color and Image Preparation
Graphic Elements
Graphic elements should be created using CMYK rather than RGB if possible. As the presses print in CMYK, this will allow greater control of color and density. Pantone colors will also be recognized by the press and rendered in the closest CMYK match.
Solid Fills
Large solid fill areas are one of the most difficult things to print consistently on a digital press. Black fills should always be a rich black, and we suggest CMYK 80, 80, 80, 100 for a true black fill. Light gray fills as well as full page pastels and similar colors are unlikely to print with perfect consistency across a full page. Grayscale (K only) fills are not suggested.
Color Images
For best results, images should have a resolution of 300ppi. Flattened TIFF or JPEG, or layered PSD, 8-bit. We recommend embedding color profiles – Adobe RGB 1998 for RGB and GRACoL 2006 for CMYK.
Black & White Images
Most images will print best with using the same settings listed for color images above. However, for truly neutral Black & White images, Grayscale files must be used - we suggest Gray Gamma 2.2. Please read more about printing Black & White images on our FAQ page.
Text
Black text should be rendered as K only rather than rich black, as using a rich black will often increase the price per book. However, light to medium gray text will likely need to be a four color gray in order to print sharply.
Content Layout
Sample Document Setup in InDesign
We will need a print-ready multi-page PDF, with 0.125" bleed on top, bottom and outside (no inside bleed). Note: The PDF should not be in spreads.
We suggest using Adobe InDesign for book layout.
Please note that all books have an even number of pages.
For designs with consistent margins throughout the book, we recommend a minimum margin of 0.5". Due to variation in printing, binding and trimming, we cannot guarantee perfectly even borders for margins under 0.5".
We recommend a 0.75" margin for text near the gutter.
When you are finished with your layout, you will export your file to a PDF.
Export Step 1: High Quality Print
Exporting to PDF
The final step after laying out your books is exporting it to PDF from InDesign.
Select File > Adobe PDF Presets > High Quality Print.
In the PDF Export Dialog box, make sure to select Pages (not Spreads).
Go to Marks & Bleeds to select > Include Document Bleed Settings
Do not include printer's marks such as crop marks, registration marks, color bars, etc. in your PDF.
To preserve embedded color profiles, go to Output to select > No Color Conversion and > Include All RGB and Tagged Source CMYK Profiles
After file export, please review your PDF file before submitting it to our site. We print directly from your PDF, therefore your file can serve as a digital proof. Using Preflight in Acrobat Pro is a helpful tool to check color profiles and image resolution.
Export Step 2: Use Document Bleed Settings. Do not include Printer's Marks!
Export Step 3: Include All RGB and Tagged Source CMYK Profiles
Understanding Bleed
Bleed is an extension of the page content, meaning that if you have a full bleed black page the bleed has to be black, or if you have an image, the bleed has to be an extension of the image all the way to the bleed edge. The function of bleed is to ensure that when being trimmed to its final size, any pages with solid background color or edge-to-edge images will not have white lines along the edges of the pages.
Contents within your bleed are 'safe'; contents on your bleed will be trimmed.
If important page elements, like page numbers, are too close to the edge, they may be partially trimmed off. We suggest all essential contents be set at least 0.25" inside of the page edge. Contents that are too close to, or right on the edge of your book (less than 0.25" from the edge), are at risk of being trimmed off slightly, or significantly changing the design of your book.
Foil Stamping Preparation
For the foil stamping we will need a vector based PDF file. Please outline your text and/or graphics before exporting to PDF. All type and graphic elements should be set to the actual size desired, and should be black on a white background. Do not make an effort to represent a foil color when creating the file.
Cover Foil
Foil dies to be used on the front or back of a book cover can be up to 5” x 12”.
If your cover’s foil stamping design will not fit on a single die, it may be necessary to use two dies which will add cost to your book order.
Some designs may require multiple dies even if they fit within 12" x 5”. We will review the number of dies needed upon file receipt.
Please note that foil stamping does not do a good job filling in large areas.
Spine Foil
Min. page count for spine foil: 60 pages
Max. Foil Stamp height: height of book minus 0.875” on top and bottom
Max. Foil Stamp width: determined by page count
Min. margin of 0.1" on either side of spine stamp
Min. margin of 0.875" on top and bottom of spine stamp
Printed Endpaper File Setup Example
Printed Endpapers
Printed Endpapers
The size of your PDF file for Printed Endpapers should be:
Book Height by twice the Book width.
Bleed: 0.25" on all sides
Printed Endpapers 4/4
For duplex printed endpapers the overall size is the same as printed endpapers.
Add a second page that is half blank, and half printed.
4/4 Printed Endpaper File Setup Example
Gatefold Pages
Gatefold pages are pages that fold out, which can be added to your books at an added cost.
Maximum 4 gatefold pages per book.
Can be added to books up to 8.75” wide.
One fold per page. The fold must occur 0.125” inside the outer edge of the book block. The folded flap must end 0.5” away from the binding (when folded). Thus, the flap area of the gatefold page file must be 0.625” narrower than the book width.
You can include these extra wide pages within your contents file or send them as a separate file.
Gatefold Page File Setup Example